
Before you start:
- The following instructions are valid for iOS 8.4, however the steps will be very similar for older and newer versions.
- The screenshots in this guide are taken from iPhone. The screens on iPad will be the same or very similar.
- These instructions are for IMAP configuration. For POP3, see the POP3 configuration guide. You may also like to review our explanation of the difference between IMAP and POP3.
- Before you start these steps, ensure your device has a working internet connection (either mobile internet or Wi-Fi). Verify this by loading a test web page before starting configuration.
Setup steps for iOS 8.4
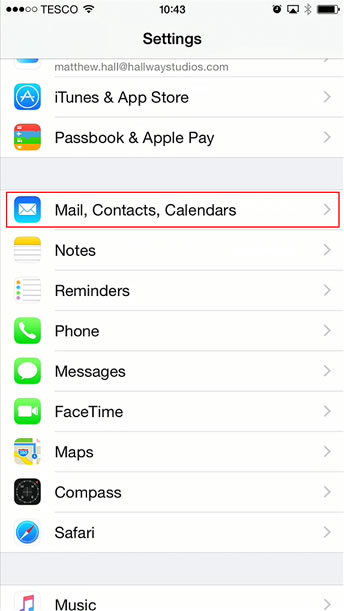
- Tap the Settings icon on the Home Screen

- Scroll down and tap "Mail, Contacts, Calendars"
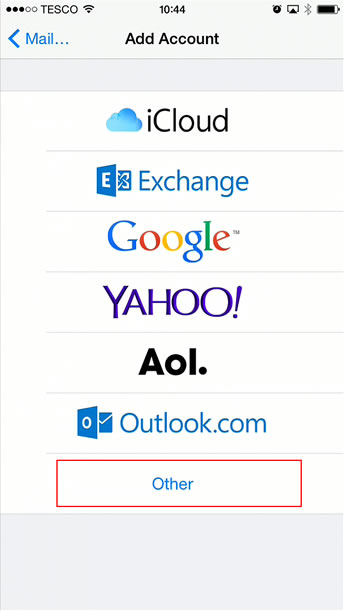
- Tap "Add Account"

- Tap "Other"
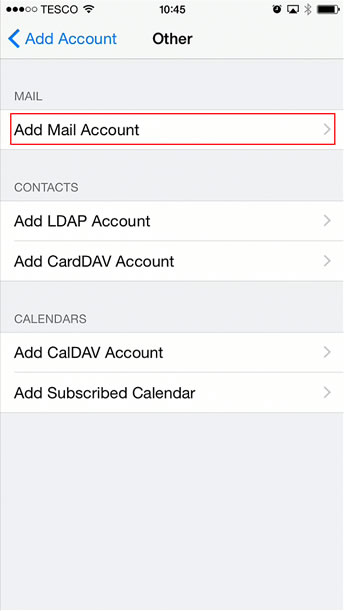
- Tap "Add Mail Account"
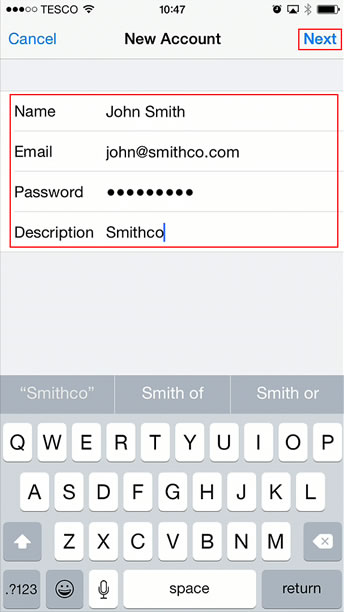
- Enter your name, email address and password for this account, and a description of which you are happy to refer to this account as (this will appear in your list of mailboxes in the Mail app. Tap "Next" when done.
- Ensure "IMAP" is selected by tapping it.
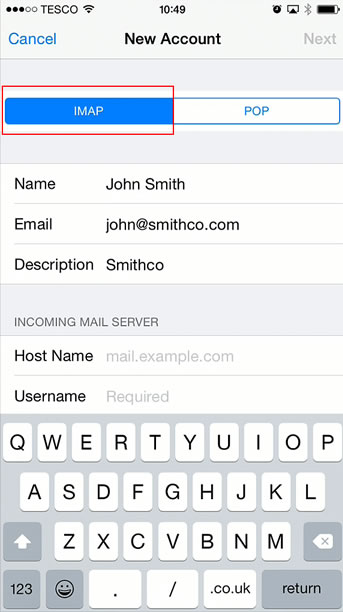
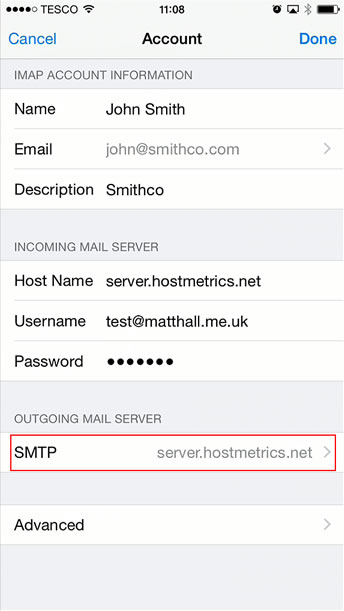
- Scroll down to the "Incoming Mail Server" and "Outgoing Mail Server" headings and enter the same details for both sections.
- Host Name: This will depend on the server your account is on - if you do not know this, please submit a ticket to request it, quoting your email address
- Username: Enter the full email address for the mailbox you are setting up
- Password: Carefully enter the password. If you're copying and pasting this, ensure that you haven't accidentally copied extra "space" characters at the start or end of the password.
Tap "Next" when done.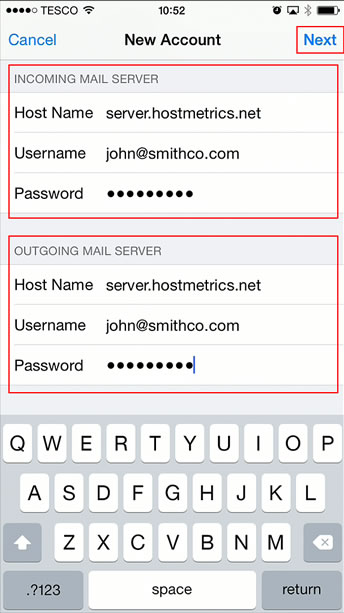
- Wait whilst your device checks the details you have entered. You'll see a "Verifying" message displayed during this check. This may take a minute or two.

- Once the verification step succeeds, you'll briefly see tick-marks appear next to the fields you entered on the previous screen, and then be presented with a list of options you want to sync for this account. Ensure "Mail" is turned on. "Notes" is optional (this will sync notes entered with the Notes app). Tap "Save" to continue.
If verification fails, your device will display an error message giving guidance on the problem. Usually this will be down to either no internet connection on your device, or incorrectly entered username or password. Re-enter those details and try again. Be aware that repeated attempts to access your account with an invalid password may result in your computer being blocked by our server for security reasons. Submit a ticket if this happens.
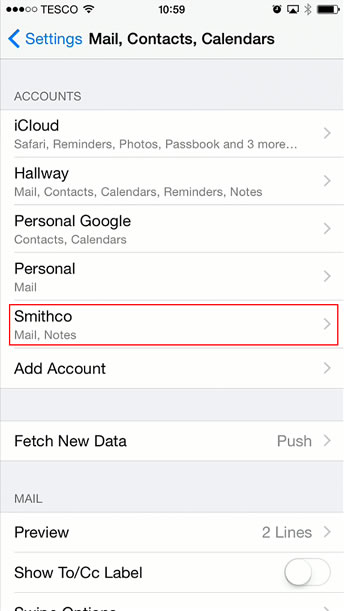
- Whilst in the "Mail, Contacts, Calendars" section, scroll down and tap the account you have just created, so that the remaining settings can be entered.
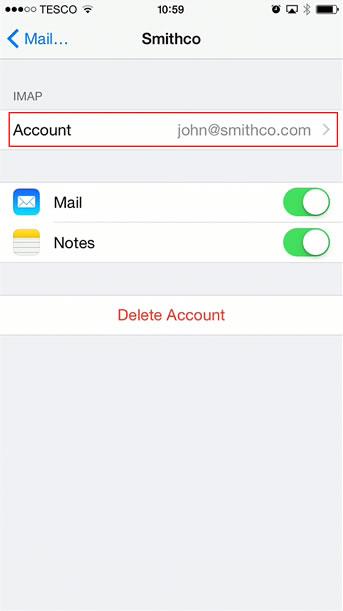
- Under the "IMAP" heading, tap "Account"
- Under the "Outgoing Mail Server" heading, tap "SMTP"
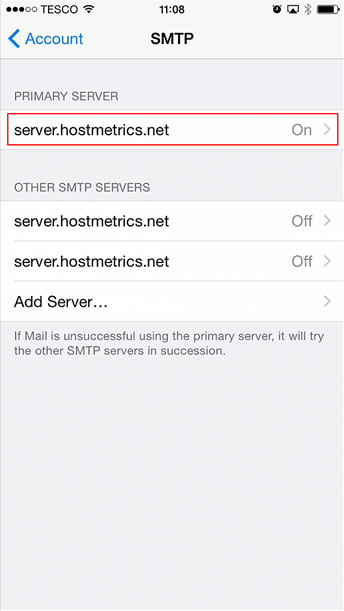
- Under the "Primary Server" heading, tap the entry directly under it (which will be the host name entered earlier).
- Under the "Outgoing Mail Server" heading ensure the following items are set:
- "Use SSL": Switched on
- "Authentication": Set to "Password"
- "Server Port": Set to "465"
Tap "Done", and on then tap "Account" to return to the Account screen.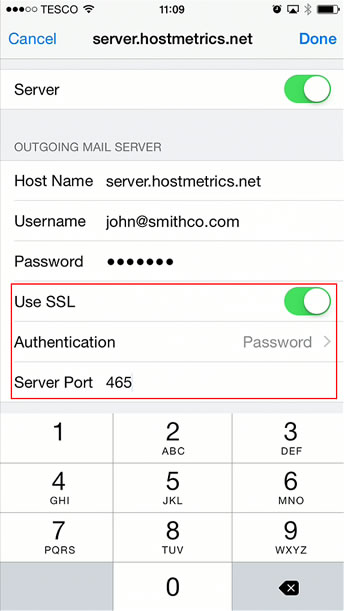
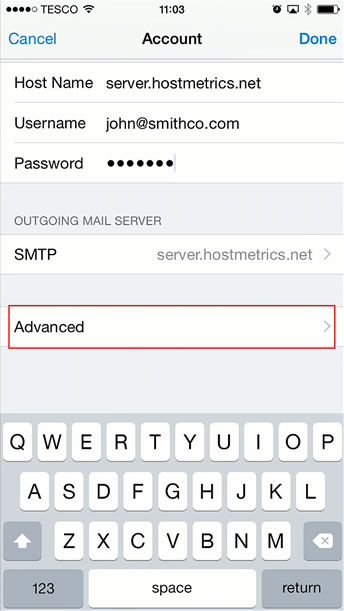
- To properly complete the setup of your IMAP configuration, we need to tell iOS what folders on the server to store drafts, deleted messages and sent messages. Otherwise iOS will store these types of messages on the iPad/iPhone only. We need to change that so you gain the full benefit of IMAP (synchronising all messages between all devices). Tap "Advanced" at the bottom of the screen (you may have to scroll down).
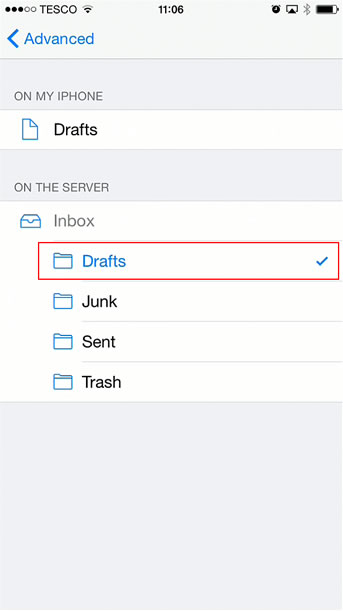
- Under the "Mailbox Behaviours" heading, tap on "Drafts"
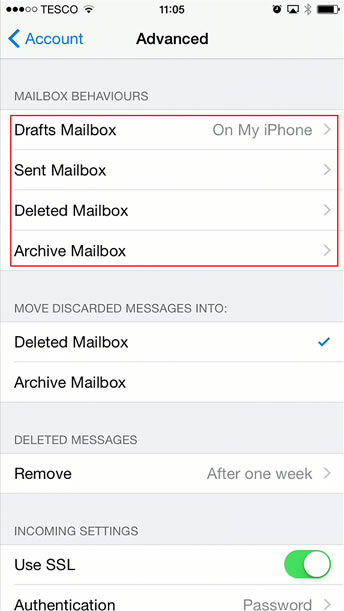
- Under the "On the Server" heading, tap "Drafts", then go back to the previous screen by tapping "Advanced". This will ensure that drafts are stored on the server and not only on your device. If you use multiple devices, this helps to synchronise folders properly.
- Repeat the same steps for the following:
- "Sent Mailbox": Select "Sent" under "On the Server"
- "Deleted Mailbox": Select "Trash" under "On the Server"
- "Archive Mailbox": Select "Archives" under "On my iPhone/iPad" *unless you have created a specific folder on your mailbox to store archives (to do this you'll need to login to Webmail to create the folder first) - Back on the "Account" screen, scroll down to the "Incoming Settings" heading and ensure the following values are set:
- "Use SSL": Switched on
- "Authentication": Set to "Password"
- "IMAP Path Prefix": Set to "INBOX" (case sensitive)
- "Server Port": Set to "993"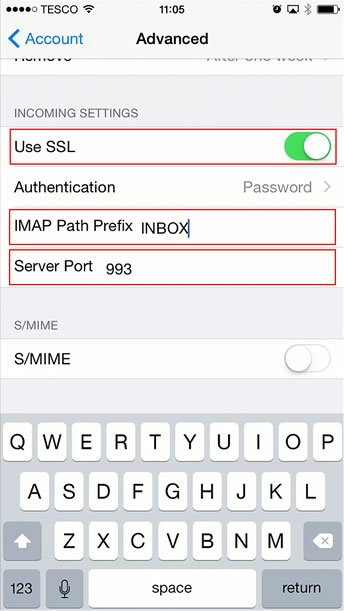
- Your account is now setup. Press the home button on your device, then tap the "Mail" icon to launch the Mail app. Your email will appear in the list of mailboxes. You can verify the account is working by sending a message from the new account to an external email address (such as Gmail or Yahoo) and verify it was received. Have the test recipient reply so that you can also verify receiving mail is working correctly.
Troubleshooting:
Password / Security Blocking Issues
The majority of issues we receive from customers about configuring email accounts are down to entering the username and/or password incorrectly.
- Remember that your username is your full email address for the mailbox you are setting up
- Check that you are entering your password correctly. It can be hard to re-type passwords accurately on iOS devices, so we would recommend copying and pasting. If you need us to send a text message to your device containing the password, submit a support ticket. Please note that we will have to reset the password in this case.
- You can check if the password is correct quite quickly using Webmail. You can access Webmail by entering the domain name following by "/webmail". For example, "http://www.yourcompany.com/webmail". This assumes your email address is something@yourcompany.com. If you can not access Webmail, you may have been blocked due to too many failed login attempts. Raise a ticket with us if this happens. We'll need your IP address which you can obtain by performing a Google search for "ip address".
SSL Issues
Some ISPs block SSL connections. SSL is recommended as this encrypts your connection and the data sent over it when connecting from your device to our server. If SSL is blocked however, you will need to disable this. Review the steps above and switch SSL off for both incoming and outgoing servers. You will need to check the ports are also correct:
Incoming port (IMAP) without SSL: 143
Outgoing port (SMTP) without SSL: 25
To check if your ISP is blocking your connection, you may like to try with and without Wi-Fi switched on and check the results in each state. If it is blocked with Wi-Fi enabled, but works with it switched off, then your home/business broadband supplier is blocking you. You may wish to call them to ask for this to be unblocked, as we strongly discourage non-SSL connections for security reasons.
0 Comments